I have a lot of card bought from various places and I sometimes would like an indication of the gsm (gram per square metre) of the card to help me with cut settings on my Silhouette Cameo. So I sat down today to work out the formula! If you don't follow the Maths, then just believe me, and I will give you the formula at the end.
1 square metre is 100 x 100 square cm = 10,000 square cm.
A4 card = 29.7 cm x 21 cm = 623.7 square cm
10,000/623.7 = 16.03
So the weight of your A4 card x 16.03 = the gsm
If you have accurate weigh scales, you need to weigh your piece of A4 card. Mine weighed in at 14g.
14g x 16.03 = 224gsm
The weight of your A4 sheet in g, multiplied by 16.03 = your gsm
I also have an A4 sheet of Kraft card weighing 18g
18 x 16.03 = 288 gsm
For 12" x 12" card (30.5 x 30.5cm = 930.25 sq cm)
10,000/930.25 = 10.75
I weighed some card stock that is labelled 200gsm. It weighed 18g on my scales.
18 x 10.75 = 194g which is close enough.
The weight of your 12" x 12" sheet in g, multiplied by 10.75 = your gsm
Sunday 18 October 2015
Tuesday 21 July 2015
Glass jars painted with Pebeo Vitrea 160 paint

So often I buy craft supplies and never get around to actually using them, but this morning I forced myself to use some glass paints that had arrived following an evening on Pinterest looking at painted glass and reading how easy it is to do. My 60th birthday is coming up, so I thought I would start to collect 60 jars for lights or flowers for the tables. I am having a few friends over!
It is a bit messy to do. Things I learnt: Don't paint the outside as some folk suggest. It is impossible to put the jar down without fingermarks. Paint the inside. Jars with "shoulders" are difficult to do. The best jar of all was a Bonne Mama jam jar. The paint is easier to apply if it is thinned down quite a lot, but this will make the colour lighter. I used a long Squirrel paint brush and worried as it all looked streaky and there were bubbles as I laid them to dry, but miracle of miracles, most of these disappear as they dry, and I told myself not to stress. No one will notice on the night. I may finish them off with twine around the necks and the names of guests.
It is a bit messy to do. Things I learnt: Don't paint the outside as some folk suggest. It is impossible to put the jar down without fingermarks. Paint the inside. Jars with "shoulders" are difficult to do. The best jar of all was a Bonne Mama jam jar. The paint is easier to apply if it is thinned down quite a lot, but this will make the colour lighter. I used a long Squirrel paint brush and worried as it all looked streaky and there were bubbles as I laid them to dry, but miracle of miracles, most of these disappear as they dry, and I told myself not to stress. No one will notice on the night. I may finish them off with twine around the necks and the names of guests.
You can mix colours, so I may make a purple once I gather more jars! I hope to be able to give everyone a jar when they leave the party. They are left to dry for 24hrs then will be baked in an oven at 160 centigrade to permanently set the paint. I love them!
Friday 29 May 2015

Friday 23 January 2015
Favourite drawing apps for Ipad and crafting
I have tried quite a few drawing apps since getting my Ipad a few years ago. By far and the way the best I have found is Idraw. (now called Graphic) Some of the features I like are:


- Easy use and adjustment of Bezier curves
- easy copying of a shape and rotating around a point to a specific degree angle
- several choices of how to save a drawing (jpeg, gifs SVG etc) and with or without the background
- Several choices of how to share the drawing with other apps. e.g. You can save to Dropbox or email the drawing to yourself.
- Zoom in facility using two fingers allows for fine detail work and you see through a magnifying glass pop up window so you can actually join one line to another
- Layers - very useful for drawing an outline in black then trying out various colours for filling in
- you can outline text for use with cutting in Silhouette Cameo, or using with laser cutters
- The page can be set to mm, cms or inches etc
- There a few on line tutorials which I found useful e.g. for getting text to follow a path such as a circle
- You can import your own favourite fonts via Dropbox. That alone is awesome!
- You can import a design made elsewhere (e.g. in Inkbot) and use it as a background within a shape.


This is an app for Ipad and I like to use it for more sketch-like drawings. It is not available for Android. Unfortunately it does not have layers, but the "undo" facility means you can recolour a shape more than once. The video is a bit frenetic, but gives you an idea of what you can do with Paper. It is very different to Idraw, but by using the two together I get all I want.


This is supposed to be the equivalent to Inkscape the open source vector drawing software for pcs and Macs, but I have found it more limited (for me anyway) in its functionality.
Do you have a favourite app I should know about?
Saturday 17 January 2015
One crafter's perspective of 3D printers
Have a look on Youtube to see 3D printers actually making items. Be aware that even a small chess piece may take 2 hours to be made. this is not like popping a sheet of paper in your printer!
There are basically two types of 3D printing system:
- The extrusion method which melts a plastic filament held on a large roll. These are the cheaper units such as Makerbot and Ultimaker. My local fabrication lab (fab lab) Make-Aberdeen has several Ultimakers.

- Sterolithography, in which a laser beam solidifies the design within a container of liquid polymer resin. The first method is cheaper, but cannot give fine detail on an object. For folk who truly need a 3D printer for making fine detailed prototypes, stereolithography is the way to go, and desktop devices such as Formlabs, are amazing.

If you feel a pull to get one, ask yourself the following:
- Can I make a 3D design myself using computer software? If not you will need to get someone to do this for you.
- Am I wanting to make a lot of the same piece e.g. small rose embellishment? Am I wanting to make a one of a kind piece, just once? If you want to make lots of something small, detailed and low cost, forget it. I hate to say it, but the chances are you can buy something similar from China at a fraction of the cost. If you are a designer making one of a kind jewellery pieces, or moulds for jewellery, then the outlay cost to final production piece makes sense. 3D printers are brilliant for making a prototype, but not for mass production.
- Is there an easier and cheaper way to make the item that I want, without a 3D printer?
- I don't know about the simpler extrusion devices, but I know that stereolithography designs need knowledge and understanding of how to tweak the software and the machine in relationship to what you are printing. When the item finishes printing, there are still finishing off steps that need to be carried out to remove support struts etc.
You don't think you can manage the drawing design stage? There are other options to making the design yourself. There are services out there with talented CAD (Computer Aided Design) designers. Google them.
You can't afford a machine but have an idea you want made that you can't get any other way? Then find out if there is a fabrication lab near you that has a machine you can be taught to use. I pay a yearly fee to use all the machines at Make-Aberdeen including 3D printers, a router, an industrial vinyl cutter, an embroidery machine and 2 laser cutters.
I suspect that the development of 3D printers may be akin to the industrial revolution. 3D printers have moved way beyond only printing with plastic. With suspended substrates you can now print in many different substances e.g. ceramic and metal. In 2014 it became possible to 3D print human tissue! I think all school children should be introduced to the concept from an early age, and the general public should embrace the new technology, not simply for the decorative arts, but for amazing advances in medical technology. Sure, there is the downside of folk being able to 3D print fully working plastic guns, but one has to be optimistic that the positives will far outweigh the negatives of his revolutionary technological advance.
Friday 16 January 2015
How to Transfer app drawings and documents from Ipad to Istick
This may not seem like being Silhouette Cameo related, but I want to write a step by step here that might help others to transfer files made in apps on your Ipad to a Mobi/Sanho Istick device which has a lightening connector to your Iphone or Ipad at one end and a USB connector at the other end.
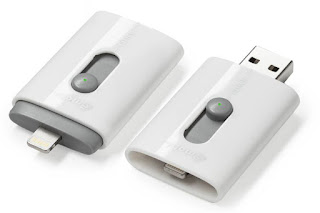
I use a wonderful app called Idraw to design on my Ipad and I cannot rave about it enough. It is SUCH fun to use and I make many designs (svg, png etc) for use with my Silhouette Cameo. My recent problem is I want to access these designs on a public computer in a community laser lab.
My options without the Istick were:
So, when I heard about the Mobi Istick it seemed the perfect way to save the files from my Ipad, onto the stick and then connect with the USB part to the public computer.
There is a good review here from Walt Mossberg on the Istick, and unfortunately until I got the Istick to try out, I didn't fully appreciate what he meant by the following. I do now! Watch the video by the way.

I use a wonderful app called Idraw to design on my Ipad and I cannot rave about it enough. It is SUCH fun to use and I make many designs (svg, png etc) for use with my Silhouette Cameo. My recent problem is I want to access these designs on a public computer in a community laser lab.
My options without the Istick were:
- Store the files in Icloud or Dropbox, or even email them to myself, however I am not going to use my passwords on a public computer that could have keyword logging software, or from which I may forget to properly log out on my departure from the workshop.
- Save designs to Dropbox, open them on my home computer, save them to a USB and take that to the workshop. However if I designed on my Ipad at the workshop I had to use option 1, which I really disliked as out lined above.
So, when I heard about the Mobi Istick it seemed the perfect way to save the files from my Ipad, onto the stick and then connect with the USB part to the public computer.
There is a good review here from Walt Mossberg on the Istick, and unfortunately until I got the Istick to try out, I didn't fully appreciate what he meant by the following. I do now! Watch the video by the way.
"The cumbersome part comes in when you want to use a file transferred to the iStick local storage area with another app on your iOS device, and it’s due to the way iOS manages files, not an issue with the iStick itself. Unlike on a computer, iOS devices don’t have a visible, system-wide file system. Instead, files that can be used by an app can only be fully used, beyond just viewing them, via that app.
Apple gets around this using a function called “Open in…,” which offers a list of compatible apps when you press an icon in an open file. So, for instance, in my tests, I was only able to edit a Word document transferred from the iStick by pressing an iOS sharing icon at the upper right and then moving it to Word for iPad or another word processor, like Apple’s Pages."
To transfer a drawing made in Idraw to Istick
So once you have bought your Istick and installed the free App for Istick that you will find in the App Store, pop the Istick into the connector on your Ipad. Open Idraw. Click on the send icon top RHS of your screen. Select "Send to app". Select the Idraw file you want to send (NB best to have it descriptively named before you send it). Click "share". Select format, size, background on/off etc. Click send. Open in Istick. Click on the open picture and hit "done". Please not you are not done, you are now half way there!
In the Istick app, click on the Ipad icon and you will now see your file in a local folder there. Mine always seem to be in "Other" folder. Edit, select files, then either select the "move" or "copy" to Istick icon at the bottom. Go back to the Istick/Mobi app screen and click on Istick. You should now see the file/s on your stick. Detach from Ipad and attach to a computer to access the files. That's it.
Like Walt Mossberg, I have also saved text files written in Office Suite Pro app in a similar manner. I don't think drawings made in other apps will necessarily have the same functionality of being able to be saved to the Istick. For example I can only send Inkbot app files via email or to Dropbox.
I can however open an svg file in Dropbox, click "send" icon, open in app, select Istick and so on as described above.....
I hope this helps others :)
Subscribe to:
Posts (Atom)