Wednesday 27 July 2016

Making a multi coloured Folk Art Collage using a Silhouette Cameo

Multi-coloured, layered Folk Art Collage Bazzill paper cut

My name is Hilary and, if you haven't realised it yet, I love bright colours. When I last visited USA I went a little crazy buying Bazzill card stock in many different colours, so today I decided to get some out and actually use it!

Several Eastern block countries are well known for bright embroidery and paper cuts. In Poland they call the art of paper cutting "Wycinanki", and they use to decorate their houses. The bright colours are often used with black, and the designs are usually symmetrical. I decided to use a couple of files from the Silhouette store and combine them to make something similar, as you see above.
EQUIPMENT:
Silhouette Cameo
Multiple sheets of plain coloured paper such as Bazzill
Glue stick
Picture frame
Samantha Walker file #8049 Bird with branches
Jennifer Wambach file #47232 Icelandic floral motif

STEPS:
Open the Bird with branches and ungroup. Select the eye + little circle and Make compound path. Select the back "saddle" piece with its holes, and Make compound path. This is so when you fill these with colour, you will have holes and be able to see the colour below showing through.

Open the Icelandic motif file. Ungroup the shapes. I found that at the size I was cutting the flower, it was best to erase two stamens, and leave just one. Image 1 shows the after and before. As you can see, the edited stamen has a rough look to it. 
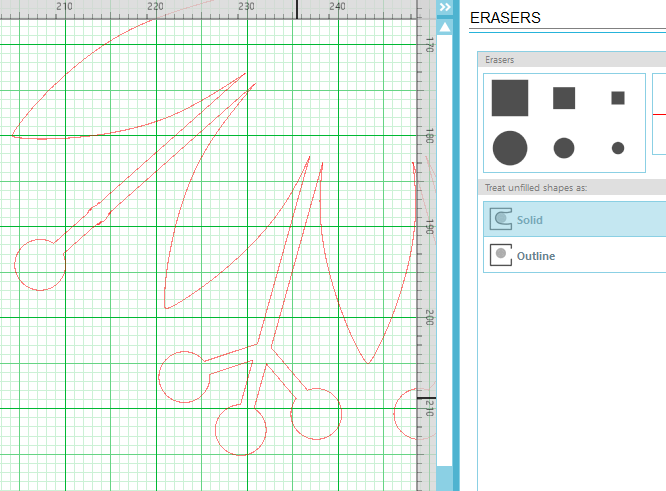
Image 1

This next step I use, time and time again, so it is important to learn! Select the shape, zoom into it and click on Edit points on the LHS menu (image 2).
Image 2

Use your mouse to select one of the rogue rough points, and delete it. Keep doing this until you have a nice, straight line for cutting. Repeat this for all four stamen groups.Zoom back out.
Replicate the large flower piece, and cut off the top flower with a straight knife tool, and solid outline selected. Delete the bottom part.
Image 3

You could simply cut out the shapes as they are now, but I wanted to weld some pieces together to make it easier to place them (image 4). I deleted the wavy pieces then used the Curved shape drawing tool to make a piece to weld as shown below. With similar methods, I also made an internal offset to the black flower, and edited it to give the yellow piece as seen in the first finished picture at the start of this tutorial.

The final piece of manipulation was to position the leaves and weld them to the black flower. I coloured in the bird pieces until I was happy with how they looked. All the bird pieces were selected and then mirrored for the second bird.

I grouped all the similarly coloured pieces together and cut them out of coloured Bazzill card. Then the picture is built up piece by piece using a glue stick. 

You may have some small flowers in your library to use on the leaves, but I made some very quickly. Using the Curved shape drawing tool, make a petal. When you select it, in the Designer Edition you will see the point of rotation. Drag this to the bottom of the petal, then replicate the petal by 45 degrees each time, using advanced rotation tool. Without the DE, you can replicate the petals, then simply drag them into position. Weld the petals together. For the yellow centre, you simply also weld a circle in the middle of the shape. I love this rotation tool so much, that I think even on its own, it makes it worthwhile to upgrade to Designer edition software.


I like to use these see through Certificate frames by Umbro as you see the colour of the room's wall through the back. Similar smaller frames can be bought in places such as Ikea, and B&M stores. 

I hope you have enjoyed this tutorial and it will encourage you to make some unique designs of your own!

Hilary from Paperspot UK


Etching a KIlner jar using a vinyl mask and Silhouette Cameo

Etched coffee jar using a Silhouette Cameo


Hi folks. It is Hilary again, and today I am going to show you how I personalised a Kilner jar for my coffee by using etching paste. Using etching paste is really simple, and yet the outcome you get looks professional, and your friends that receive an etched gift from you will be super impressed! I once hosted a birthday party for my closest girlfriends, and I etched a glass with each of their names which they got to take home at the end of the night. Etching on a curved surface makes the process a little more complicated, so for this tutorial I chose a flat sided Kilner jar That also meant I could have fun with all four sides. Oh - and before you ask, the butterfly was Photoshopped in place. I couldn't resist it :)

SUPPLIES:
Etching paste, such as Armour Etch, which is easily available on line.
Spare vinyl or Silhouette special stencil vinyl
Transfer tape
Scraper or lolly pop stick
Small paint brush
Newspapers, plastic gloves, wet cloth and drying cloth
A glass Kilner jar or something similar
Files by Nic Squirrell - Moonlight Hare gift bag #72615 and Leaping Woodland Hare card #68621
A font such as SNF Party Script #114250


STEPS:
1. Side one (the writing).
Choose a font to stencil. I used SNF Party Script, because the words I wanted to use, "Hilary's Decaff" had very few islands to sort. By "islands" I mean the bits that would fall out of a cut stencil See the image below. I needed to attach the centres of the little "s", the two "f"s and improve the connection to the centre of the capital "D".
1. The writing
Type the words. Select them and Ungroup. Merge the letters that overlap. You may need to move individual letters a little bit to get them to overlap, or you may need to make small joining pieces such as tiny rectangles. I selected the small letter "s", and using the smallest rubber, and selecting "solid" I rubbed out a piece to connect the middle area. I did the same thing for the other letters mentioned above. You may get a jagged edge, so select that letter, select Edit points, zoom in and delete or drag points to improve the outline. See the image below. The "f" on the left has already been tidied up. Now you are ready to cut these as a stencil from vinyl. I used ordinary vinyl left over from other projects, but you can buy special stencil vinyl from Silhouette if you intend to make many stencils.
2. Preparing a font for stencilling

Pop your vinyl on the mat and load into your machine. Pick the Vinyl cut settings and adjust your blade in the Silhouette to 1. Cut out the words and weed the bits not wanted, using the hook and tweezers. You should now have your vinyl stencil ready as in the first image below.
3. Preparing and using a vinyl stencil
Apply transfer tape as shown in the second photo, and carefully remove the white, shiny vinyl backing paper to expose the sticky surface. Your stencil should now be attached to the transfer tape and looking back to front as in the third, top image. Clean the glass surface with alcohol to remove any grease from fingerprints and the like. Give it a polish with a soft, lint free cloth and do not touch the surface you want to etch with your fingers.

Apply the vinyl to your glass surface (image 4). Smooth out the vinyl and get rid of any lumps and bumps. Pay particular attention to fine detailed areas, using a nail to make the vinyl adhere well to the glass, and stop etching paste from going under the stencil. You want crisp outer lines.

Prepare your working area, protecting any surfaces (including your skin) from etching paste. Wear some plastic gloves. If you get any etching paste on your kitchen surfaces, or table, the etching paste will mark it. Wipe and wash away any paste that is not where you want it to be, immediately you notice it. Apply paste according to instructions, on top of the cut out areas. Do not get etching paste onto areas where it is not wanted! Leave a minute or more. Remove excess paste with a spatula or wooden lolly stick. Return to the pot for use later. Pick off vinyl and wash and dry jar. When the glass is wet it will look like nothing has happened, but as you dry the glass your work of art will appear like magic! I work on one side at a time.

2. Side two.
Using the Gift bag file, Un-group and delete unnecessary pieces of the bag. Adjust the size of the hare and flowers to fit the side of the jar. Etch using the method outlined above.


3. Side three.
Adjust the size of the hare. Using one of the stemmed flowers, copy it twice and adjust the height so the hare will look as if he is jumping over them. Etch using the method outlined above.

4. Side four.
Select the least detailed flowers from the Woodland card file and delete the others.

Copy them several times and keep to one side. Make a circle around the hare as a guide. Arrange the flowers around that guide line, and when you are happy, move the circle to one side. Group the hare and moon, and keeping them to one side, group the circle of flowers. Centre all the pieces and make the circle bigger so it will be the cut line around the picture. Cut it from vinyl. See the multiple images in #3 photograph above.

Etch using the method outlined above.

I now have this jar at my window, and I can't tell you how much pleasure I get from it first thing every morning. I hope you will have a go at etching on glass. If you take simple precautions, there is nothing to be scared of!


Altering a shadow box design to use vellum using Silhouette Cameo

Fancy a bit of a challenge? My name is Hilary, and today I am making a 3D shadow box card from a design by Lori Whitlock, but with a little twist of my own.

I remember going to the pantomime as a child and loving the way the scenery would layer in at the sides, so that dancers could come in at different areas of the stage, and you visually got a feeling of depth. Then the lighting engineers could alter the lighting so that the scenery would become semi-transparent. It was magical! As I practised and experimented with this file, it occurred to me how the shadow box card looked like a tiny theatrical stage setting, and I thought that by using vellum I could create some magic of my own.

When the card is placed at a sunny window, light shines through, and when it is dark, a battery candle can be placed behind for more drama.

There is an excellent tutorial here by Lori Whitlock on how to put the basic shadow box card file together and if you have not made something like this before, I would definitely recommend a couple of practice runs, as I did.  As vellum is rather thin, it made sense to keep the supportive card "windows", and just cut the vellum for the pretty details. This involves a little bit of work, but I think the result is worth it! 

I would categorise this as a tutorial for those with moderate expertise. 

SUPPLIES:
File: Lori Whitlock, Bluebird Shadow Box Card #84282
Vellum - 3 sheets of A4
Card stock - 3 sheets of A4
Glue

STEPS:
1. Making the vellum shapes
Open your file from the library and move it to one side of your design space. We will use those pieces later. Make a copy of the file and keep it on your design area (Edit/Copy/Paste). Ungroup the pieces as normal. You may need to ungroup them more than once. You should have 7 layers now separated. Delete the bluebird and the plain rectangle. You should be left with the peices as shown in image 1.

2. To cut out what will be vellum areas, continue as shown below. The size of the rectangle does not have to be exact, but you want a border big enough to apply glue. I find the pieces are easier to work with if you give them a fill colour. Any colour will do. Select two pieces, and when you hit Modify/Crop it acts like a biscuit (cookie) cutter whilst deleting the outer area at the same time. The inner rectangle for the back window should be around 9 x 11 cm.
Image 1
I drew some tiny stars and 1mm holes on the back, plain rectangle. Select all the circles/stars and the rectangle and Make compound path. You now have the 5 vellum pieces prepared, which should look like image 2. Move them off the design area, to one side.
Image 2
3. Making the card "windows":
Using the copy of the original files that you previously saved beside the design area, bring them onto the design area. Ungroup them and deleted the unnecessary pieces (bird and rectangle) as before. You are now going to make the supportive window surrounds which will be cut from cardstock. Make the rectangular cuts as close to the original window aperture as you can, whilst removing all the shaped pieces. The window in the solid back piece of the box, where the stars will go, should be approximately 8.5 x 10.5 cm. See first row of image 3.

In image 3 I only show you two layers (before on the left, after on the right), but please note, the same operation must be carried out on all five pieces. For each piece, make a rectangle, place it in the centre of the area as shown. Select both pieces and go to Modify/Subtract. You will be left with the shapes as shown at the right hand site of image 3. Depending how your elements are grouped (i.e. the dotted lines and the surround), when you hit Subtract the centre may disappear, or you may have to delete it manually.
Image 3
4. Once you have done this operation with all five card layers, you should have 10 pieces to work with, as shown in image 4. Select all the soon-to-be vellum pieces and open the Scale window (top, right). In the custom area, type 103% and hit Apply. This simply ensures that the vellum inner edges will be hidden neatly by the card window frames. Drag the vellum pieces under the card frames just to check everything is sized correctly, then separate them again.


5. You can cut two shapes per A4 sheet. Select the shapes I have shown above in light grey. Pop vellum into your Silhouette on the carrier sheet, set the software cut settings, and adjust the machine knife accordingly. Do a test cut, and if everything is OK, cut out the 5 vellum pieces. When lifting the vellum off the carrier sheet, take great care not to tear or bend your design pieces. When vellum is bent or scratched you get white lines. Remove the vellum shapes from the cutting area, and start to arrange the card pieces (shown as white, above). You can fit two pieces on each A4 sheet.

Put your card into the machine, adjust the knife settings on the machine and within the software, and cut out the 5 card pieces.

6. I use a Scotch tape glider to apply glue down four sides of the back of each card window and carefully position and stick on the vellum. Your five layers are now complete, so it is time to have a close look at Lori's video, to understand how to actually construct the shadow box card.

MAKING IT YOUR OWN:

  • By using "Print and cut" you could write a sentiment or personalisation on the front window of the card with Silhouette silver and gold pens. This would need to be done before cutting out the frames. Or you could cut a sentiment from silver or gold sticker material. 
  • You could make small embossed, cut and (even) coloured, vellum flowers on the front window.
  • You could design your own vellum layers to make a completely different picture. For example, what about layers of growing flowers, or perhaps a garden scene of flower pot, boots, a wheelbarrow and a deckchair?
  • I made the box from classic white card, but you could use patterned card for a completely different look.
Shadow box card tutorial on SilhouetteUk.blogspot.com

The variations are endless, and the finished effect is very impressive. Amaze me, and amaze yourself! Come on...show and tell time!


Free Happy Mail design from Silhouette Cameo design store

Free Design of the Week Silhouette Cameo 27_7_16
The Free DOTW!
The first changes I made to this file were made in Photoshop Elements. I changed the background to a watercolour red and changed the words to Happy Post for my UK audience.

The second design was altered in the Silhouette software. I traced the shape, Released compound path to delete the other lettering and delete "second lines" around the small spots and the square. That let me introduce a background pattern to the square. I then made a circle, with an internal offset. I made that a compound path and filled it with pink and made the loopy edging by replicating, aligning, grouping and rotating the circles, and layering them behind. I made a white circle and wrote Happy Post on the next layer up. I made a square cut line around the design and voilà, a pretty sticker to use on an envelope! 

I hope you will play with the free shape!

Thursday 19 May 2016

Weigh your A4 card and use this on line calculator to discover the gsm

This is very useful if you need to describe your card weight to a customer and don't have a note of it. Weigh one A4 sheet and pop it into the calculator on this site. The link is here.

Tuesday 12 April 2016

Make a picture of your county or shire using gold sticker paper and a free pattern file.

The free shape this week is of a striking black and white triangle pattern which when downloaded will automatically go into your backgrounds folder. In the USA there is a lot of pride about what State you come from and you will often see folk making items using the easily recognisable shape of their State. In the UK, our county lines are not so easy to recognise, but I thought it would be fun to take this idea to use for Aberdeenshire where I live. It is the "sticky out" bit in N.E. Scotland. 

STEPS:
I had an unused frame in dark brown and old gold. I found an outline of my shire on the internet and used the tracing tool on it. I made a square larger than the hole I was going to cut and filled it with the background shape, inverting it so it looked like mountains. I live in a mountainous  region which includes the Cairngorms and Ben Nevis. I printed the pattern on gold sticker paper and cut the square with scissors. As I was printing the name of Aberdeenshire just above the shire shape, I had to put on registration marks. Once printed, I put cream card in my Silhouette and cut out the window shape of Aberdeenshire as well as a small red heart as a focal point. 

It was a super easy project, and went smoothly until I stabbed my left hand with a screwdriver as i put the back in the frame!

I really love how it turned out. If you decide to try this out for your own county or shire, I would love to see it.

Have fun!
Hilary

SUPPLIES:
Silhouette Gold sticker paper

Sunday 10 April 2016

Designing and making a canvas name banner with a Silhouette Cameo

How to make a Printable canvas name banner with a Silhouette Cameo

For instructions on how to make this name banner using a Silhouette Cameo and printable canvas, have a look at the Silhouette UK Design blog. I describe how to make your own gingham pattern, pick different shapes and fill with patterns and how to make up the banner. Please let me know what you think!

Best wishes,
Hilary
How to make a Printable canvas name banner with a Silhouette Cameo


How to make a gingham pattern with a Silhouette Cameo
How to make a Printable canvas name banner with a Silhouette Cameo

Friday 8 April 2016

Free Silhouette Cameo Design of the week: March 30th 2016

To see how to make up this Folk style basket, pop over to Silhouette UK Blog. I used mirror card which was a great thickness to make a sturdy holder which could be used for wedding or party favours.


Monday 28 March 2016

Delicate pink tipped Daisy wall art


I had such fun designing and making this for the Silhouette UK Design blog. I decided to make them as large as I could using A4 card stock, but they would be really sweet used on a card as well. My tutorial describes how to use the shading fill in the Silhouette software to make this radial shaded flower. What do you think?

Starry mint and gold fairy card with vellum


Here is an easy to make, delicately coloured card for you to print and cut, using card stock, gold glitter card, gold sticker paper and vellum. You will also need a Silhouette gold pen for the writing on the vellum. You will find the tutorial over at the Silhouette Design Team UK blog.

Fresh or Fowl T shirt transfer.


Is your little person Daisy fresh or pretty fowl? You will find my first design tutorial on how to print and make this T shirt transfer over at the Silhouette UK Design blog.

Sunday 6 March 2016

This is a really simple, small business marketing idea, and is aimed at a beginner.

Graphtec GB sells scratch off sticker sheets. I have seen them used for Gender reveals and the like, but it occurred to me today that most people love these and can't resist a scratch - so to speak! Also, with commercial scratch cards one never seems to win anything, so how good would you feel as a customer to receive a scratch card with your order, scratch off the silver and find you had some money off, or free postage on your next order? So this is my idea for all of you out there with small businesses! 

My website e-commerce product (which shall remain nameless) allows me to set up codes for this sort of marketing tool, and I can set it to once only, until an end date, or for use a certain number of times before it becomes null and void. If your site is not that sophisticated, you could still send out codes and keep a note of them on a good, old pad of paper. I think I will send these to customers who place orders over £30, and advertise them on my blog and Facebook pages to encourage traffic.

Equipment:
  • Silhouette Cameo or Portrait
  • Printer
  • Card stock
  • Silhouette Scratch off sticker sheet
  • LW Typewriter font by Lori Whitlock #55159 (optional)
  • Paper cutter (optional)

Draw a rectangle with the rectangle tool, fourth down on the left hand side. You can make it any size you want, but a common business card size is 5.5 cm x 8.5 cm. Either adjust the size manually, or open the Scale tool which you will find on the top menu. It lies just to the right of the rotation tool. 

To import a business logo or picture, go to File/Merge on the top menu, left hand side. Find a picture on your computer and select, then hit OK. Place it within your rectangle. Select the Text tool (LHS), choose a font from your list on the RHS. I used the LW typewriter font #55159 available from the Silhouette store. Type whatever words you want. Adjust the size to fit your first business card, and make more text areas as needed.

As I am not going to cut this on my Silhouette, I don't have to worry about what lines are set to Cut, and I don't need Registration marks. Select the outer line of the card, and open the Line Style menu (top menu). I made the lines blue, but you can leave them red. Adjust line thickness to 0.5. This is to ensure the lines are printed to help you slice with your paper slicer. Replicate the business cards on your A4 paper. I got ten onto the one sheet. Print this onto card. Cut the sheet into individual cards. 


Draw a shape that will cover the text code area of your card. I chose a rounded rectangle. Select that shape and press Ctrl+C to copy it. Make a new file and press Ctrl + V to paste the shape.With one sticker selected, go to Cut Settings and select "Scratch off Sticker" under the settings. Replicate the first sticker as many times as you want. 


Put a scratch off sticker sheet onto a cutting mat. Check your blade is set to a depth of 2. Send the file to Cut. Remove the mat from your machine and gently remove the shapes. I found that some of the yellow backing paper wanted to come away. The sticker should have a black underside if all the paper has been removed. Apply them to the area of the business cards that you want hidden. That's it. All done! It is tempting, but resist from having a scratch yourself :). 

Best wishes, Hilary


This is the lovely free Shape of the Week available from the Silhouette Design store until Tuesday. We would love to see what you make with it over here.

Tuesday 23 February 2016

Silhouette Cameo Design Team 2016 News!!

I am really delighted to say that the other week, I was one of eight folk picked to be a member of the Silhouette Cameo Design Team UK for 2016. It took me a while to decide if I had the nerve to do it, but I submitted my application, and here I am - nervous as heck, but pleased as Punch!

We have to make and document projects each week, so although it will be a challenge, as my husband said, I make things with my Silhouette Cameo every week anyway! Tonight is just a quick post as I will be away for a few days, but I am really delighted with my first project which involves daisies, and that will be posted at the end of the month.

This week's free file from Silhouette is a flower, and as a friend has a birthday this week, this is the design I came up with. The flower reminded me of a Poinsettia, hence the colour choice, and as one of the backgrounds in the Silhouette Cameo software consists of black and white stripes, that just seemed perfect with it - classy elegance with a touch of pzazz!

By releasing the compound path in the Silhouette software (on the top menu, Object, release compound path) you can alter the individual pieces and choose what colour to make them. I chose white for the background that lies on the layer underneath all the other shapes, and once everything is reconstructed, you have this beautiful, colourful flower. The Silhouette software that comes with the machine is super easy to use, not only for altering bought (or free!) shapes, but also for making shapes of your own. It is the best craft machine I have ever used, and I have been using it almost every day for three years.

After I made the card, it occurred to me that matching gift wrap would be fun, so I printed out the stripes and the floral paper on ordinary printer paper, plus a gift tag.

Check out my fellow Design team members , who will be posting regularly on the Silhouette UK Blog

Welcome to my world, and I hope you will start to follow my Blog and ask lots of questions about using the Silhouette.

Tuesday 16 February 2016

Using the free shape of the week Silhouette Cameo

My husband isn't the declaration style lover. He is more "I'll wash your car and top up the washing fluid" style of guy, which l actually prefer, so the inside had to be something that would bring a smile. Inside it reads "Yesterday you really made me mad!", which is true as we are always arguing about something, and yesterday it was how to get to our daughter's house after he had taken a wrong turn :)

When I used my own dotty infill for the letters, for some reason, as you can see, the scale was different within different letters. This could be sorted by separating the letters and adjusting the background scale, if it bothered you.

I always have packs of cut outs left over from other projects, so I used up some flowers, made the card as a gate fold and fastened the front with a brad and some Bakers' twine.

If my Mum had been alive, it could have been used for Mother's Day, but the inside would have read"...and less than tomorrow!"

I hope it inspires you!

Wednesday 10 February 2016

This was designed by myself from scratch and took a day and a half to get to this point. It is a surprise for a friend's daughter and son-in-law.

Saturday 6 February 2016

4th February 2016 free design from Silhouette Cameo

I have to say that initially I was not inspired with this week's free file, but once I had injected more colour, changed the words a little and given it a James Bond style bow tie, I have to say my husband  may actually get a Valentine's card this year! I hope you like it!

I turned the black heart upside down and made a small stem to fuse to it, to make the spade symbol. The club symbol was made by fusing three circles and giving it stem as well. The four symbols were aligned, spaced horizontally and then I made a vertical pattern to make the frame. I used one of the Jacquard style backgrounds on the cards and copied that grey for the bottom mat. The next layer was simply the supplied card shape with a few extra words. By tracing the black lips I made red ones. I was going to put a red bow on the card then I suddenly thought about Sean Connery and the card just had to have a bow tie! 

This just goes to show what you can do with a few very simple shapes and a Silhouette Cameo.

Friday 5 February 2016

Favourite things made with my Silhouette Cameo

As I may be applying to be a designer/blogger for Silhouette Cameo SC) for a year, I thought I would do a quick post of some of the pieces that are my favourite "makes" with my Sil. This house was a complete copy of one made by Torie Jayne. I thought it was simply the most beautiful thing I had seen, and that I could not improve upon it. The advent house came from Panduro hobby and arrived with several drawers broken in transit, however they kindly sent me another - which also had broken in transit - so with a bit of glue I had two houses to decorate. It too me 2 years to get around to it, using papers by Tilda, which are to die for I reckon. I gave this to my daughter for her November birthday and I hope it will become an heirloom!

Using the Pixscan mat for my SC was invaluable as I could get all the front pieces cut out centrally on many of the paper pieces for the drawers, which also had round holes cut in them for the drawer handles. The SC made it all a breeze, and a most enjoyable project.


Below, you can see a card I designed from the photo of a house my friend was moving to. The SC software makes it easy to draw simple shapes for windows, doors etc, and both, me and my friend were well pleased with the result!
Box cards were all the rage for some time, so I made one for the arrival of our first grandchild.
The onesie, and the rocking horse shapes I designed for myself on the SC. Templates are available now for the box card, but I designed my own.

The friend of a friend was being given the honour of being made a Lord Lieutenant of Scotland, so with a little research, I came up with this simple, but effective card for him. A Lord Lieutenant is the Queen's personal representative within a country.
Having seen a lovely birthday card in a certain High street store, I thought, "Now there is a good idea" and I designed this card. SC users will recognise some of the background patterns used. It took quite a while to design, just to get the colours right, and the different levels of letters right, by which I mean some were printed, some pieces were cut and stuck on flat, some letters were cut out with paper stuck behind, and then some letters were raised on sticky pads. Letters which were to be printed could be a thin font, but for cut out letters the font had to be chunkier, so there was a lot to think about!
This card features a drawing I did on my Ipad using the app Paper53. My little chickens have now been used on a multitude of projects! I am dotty about spots which is one of the reasons I started my little shop for customised paper items at PaperspotUK.
Finally, I used to do a of silk painting and have a lot of scrap material lying around, so this was an effective way to use some pieces up to make a one-of-a-kind card.
Well there we go. Not sure if what I do will be good enough to join a design team, but I love my Silhouette Cameo so much, I can't help but use it every day for something or other! If I am not accepted I will simply have to continue making cards for friends and family :)

Happy crafting!

Hilary